


CTD Operator’s Duty List
(CTDOperator Duty List2017.doc 08/09/2017 - CURRENT VERSION)
These instructions are designed for use by CalCOFI CTD operators and describe our step-by-step protocol for CTD operations at sea. They outline our preferred method but are not considered "gospel" - there are many techniques that result in good data from the Seabird 911+ CTD. But based on our long history of using Seabird hardware & software, we've established these guidelines for our CTD operators to follow. Standardizing our methodology between operator improves our data continuity, format consistency, and makes problems with our system easier to catch.
1). CTD Prep: ~20 minutes before station arrival, rally the troops for CTD prep. If weather-decks are secured because of rough weather, wait until arrival to station.
- Rig the bottles open, lanyards right, bottom caps left; bottles left of stanchions (5, 11, 17 & 23; with extra lanyard extension loops) should be rigged lanyards left, bottom caps left; tighten breathers valves finger-tight, pull spigots out to close then rotate off pins. Note: bottle valves should be oriented at "4 o'clock" to allow bottom caps to angle to the left easily and easy access for seawater sampling.
- Pull pump DI rinse tubes, uncap PAR & pH sensors; rinse the transmissometer optics with RBS (squirt bottle).
- Plug in the ISUS battery ~15mins before cast - this can be done when bottles are being prep but postpone if secchi cast or net tows are first. Unplug the battery is there is going to be a delay of more than 20mins.
2). Prep Seasave on CTD Computer:
- ~15 minutes before cast, power-up the CTD deck unit and start data acquisition in Seasave without archiving data to file. Carefully verify the Cast ### & data filename (YYMM###) and directory are correct. Data files are moved & stored in the ‘archive’ dir but data should not be acquired there or the ctdbackup utility will not be able to find the files. Leaving the "Not archiving data" dialog box on-screen as a reminder data are not being archived is highly recommended.
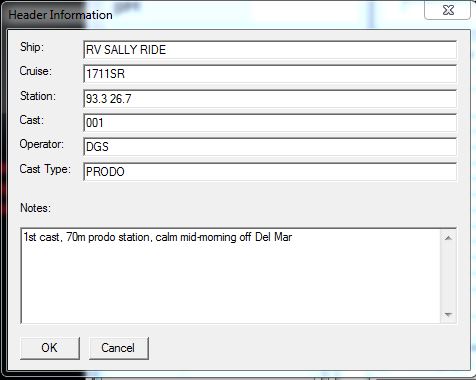 Fill out the Seasave header form – be sure to use the long version of line and sta (ie 93.3 45.0, not 93.45). Add any comments that might be worth noting or effect data processing such as calm or rough weather, rain, equipment changes, or any startup glitches. Be sure to triple-check the ‘Station#’, ‘Cast #’ and ‘Cast Type’ (ROS, PRODO, SCCOOS) are correct.
- Connect the ISUS battery if not already connected. After letting the deck unit & CTD electronics warm up for several minutes, log the lowest deck pressure on the station sequence (“cheat sheet”) clipboard or console ops form.
3). Upon station arrival:
- Work vests & hard hats are required for everyone participating in deck ops
- Ready the launch of the CTD if it is the first operation - secchi or nets may be 1st on morning prodo station. If CTD ops are 1st then untie/unstrap the CTD from deck eyes.
- Double-check the tubes are pull, sensors uncapped, ISUS battery plugged-in
- On SIO vessels:
- The restech or watchleader requests permission from the bridge to launch the CTD after checking the ocean surface for hazards (kelp, oil or diesel slicks for example)
- With permission granted, instruct the winch operator to engage the auto-deployment (on ships with LARS like RV Sally Ride) or manually deploy the rosette and lower to sea surface.
- On NOAA vessels:
- Tell the survey technician and deck ABs the CTD is ready - they can deploy whenever they and the bridge are ready. I usually stay on deck to lend a hand if there are any issues then once the CTD is zeroed at surface, go inside to start the 2 minute timer.
- When the weather is rough, insist the survey tech & ABs use taglines when deploying and recovering the rosette, if they are not.
- Send the CTD down to 10m - be sure there is at least 15m of bottom before sending the package down to 10m by checking the bottom depth before deployment.
- Once inside, start the 2min timer. On vessels with echosounder: check the Knudsen for a bottom depth otherwise ask for a bottom depth from the acoustics or survey tech. Use the clipboard "cheatsheet" to estimate where bottom should be and record the bottom depth if reasonable
4). Seasave Ops:
- Once two minutes are up, verify the pumps are ON, the sensors are giving good data and (generally) agree, then bring the CTD back to just below surface.
- Check the CTD is under the surface deep enough it does not pop out during rolls but not so deep the CTD depth reading at surface never shows ~2m (unless VERY rough). This can be done during launch or after the 2 minute soak, prior to starting data archiving in Seasave.
- Initiate data acquistion in Seasave, selecting Start Archiving (Real-time Data/Start Archiving from the Seasave menu) then verify the data file is saving data using the YYMM### filenaming format (### is the cast # ie 1711001).
- Once archiving, keep the CTD at surface ~1 minute, double-check all the sensors are still measuring reasonable values (mainly T, S, O2, pump). Note: some operators start data archiving before deployment then remove the deck & 10m soak data after the cast. SIO-CalCOFI prefers to not log data until all systems are flushed and measuring stable, good data.
- Send it down to terminal depth, usually 515m depth-permitting. Once the chl max is determined, select the appropriate Cast Type (I, II/III) Console Ops sheet. If the bottom depth is less than 515m, be sure to keep an eye on the echosounder and the altimeter readout. The altimeter usually does not detect bottom until ~50m from contact. When the weather is rough or if there is a high wire angle, it can be less so use caution on shallow stations. Use the altimeter to adjust the CTD depth on casts near-bottom - never get closer than 5m during calm weather or 10m during rough weather.
- When filling out ‘filename’ field on console ops, double-check data logging by verifying the filename in the upper left box of Seasave. It should read “Archiving data to C:\YYMM\YYMM###.hex”. If not archiving, return to surface, start data archiving, hold for ~1min then start back down. If mislabeled, finish the cast but rename the files using ZTree after data acquisition is stopped but before <Ctrl><Alt>B is pressed. Note: the "Fire Bottle" and "Mark Scan" buttons will be greyed out and unclickable if data archiving has not been initiated.
- Check with LTER, ancillary projects or prodo person for extra bottle depths and add/edit the desired bottle depth(s) as needed. NCOG & prodo samples usually require extra bottles closed.
- When arriving at the terminal depth:
- Record the sensor values on the console ops: wireout, arrival time in PST, depth to tenths; T, C, S to .000; altimeter to .0 (if shallow) waiting at least 20secs for proper bottle flushing
- Mark & trip the bottle, log closure time - if bottle closure is confirmed, the bottle trip number onscreen will increment. If it does not, there is a problem.
- Create a nav entry (only 1 on the 1st bottle trip).
- CTDatDepth event - switch to the Eventlog program, select CTD AT DEPTH event, your initials then [RECORD EVENT]). Note: on SIO vessels, the Bridge Watch usually records the station activities so coordinate with them regarding recording CTDATDEPTH. Either you or they should be responsible - if they are responsible, double-check it was done and do it if necessary. Sometimes they get distracted or busy and forget to log station activities. Their entries will display on all eventlog tablets including the CTD eventlog.
- Bring the CTD up to the next desired depth - adding 1m to the remote depth readout box ‘lag’ or subtracting 2m for RV Sally Ride wireout offset; fill out the console ops record; the CTD should sit at that a depth for a minimum 20secs to flush properly, mark & trip the bottle. If the bottle depth is off by more than 2m in calm weather or 3m in rough weather, have the winch operator adjust the depth. This range is less flexible during prodo casts where the median depth should match the target depth exactly.
- Keep track of the marker and bottle trip counts – they should match each other and the console ops. Sending the CTD back down to collect water is a good idea if you find you missed a bottle trip. Just note it and adjust the sampling. If you create an extra marker, edit-correct the .mrk file before <Ctrl><Alt>B. If you accidentally trip an extra bottle, create a marker for it, keep it in the .mrk & just flag it ‘Extra – No Samples’ in CESL.
- On SIO vessels: at ~100m, ask the restech or a watch-stander to go out on deck & watch the wire.
- Once the last bottle is tripped, recover the CTD, leaving Seasave logging.
Please refer to CTD troubleshooting tips at the end of the document for information on dealing with CTD cast problems.
5). CTD recovery:
- If possible and weather-permits - have the CTD lifted out of the water so you can verify all the bottles closed. If any are opened that shouldn't be and you can figure out the bottle number, send the CTD back down to get the mistrip bottle sample. Otherwise initiate CTD recovery:
- On NOAA vessels have the survey tech contact the bridge for permission to recovery then, once granted, have them lift the CTD just far enough out of the water that tag-lines can be hooked to the upper ring. Once the tag-lines are cleated, they should recover the rosette - another tag-line is often attached near-bottom, on the inboard support to aid in bringing it further inboard. During rough weather, be sure they are patient before raising the CTD out of the water for taglines or recovery. Note: the CTD weighs ~1500lbs when full, 800lbs empty. If not already happening, ask the survey tech or AB to pull enough slack in the CTD wire for net ops while you go inside to shut down the CTD acquisition.
- On SIO vessels, the restech or watchleader contacts the bridge for permission to recover, once granted, have the winch operator initiate "LARS auto-recovery" or manually recover the rosette when sea-state permits. You should stay near the rosette landing area so you can pull the rosette away from the bulkhead when close to landing. This allow easier inboard bottle access for sampling.
- All vessels: once the CTD is onboard, record the final deck pressure on the console ops, stop data archiving in Seasave using ‘Real-time Data/Stop’ – this is critical BEFORE turning off the deck unit, press <Ctrl><Alt>B on the keyboard to immediately back the data up and generate the sample log base file; turn off the deck unit.
6). Sampling
- Unplug the ISUS battery ASAP and cap the PAR & pH sensors.
- Load the Sample Log in CESL, verify the cast information looks good, check/change the O2 case #, salt case #, nut rack color.
- Draw O2s first then DICs second, if necessary, then all other samples.
- Verify all samples have been drawn and double-check ALL salt bottles and nutrient tubes have been filled.
- Add sampler’s initials to the Sample Log, then Save
- Pick up the chl form printout from the laser printer & filter chlorophylls within 45mins of sampling.
- After chl filtering, shake the O2s a 2nd time, "XX" the label then add it to the O2 sample analysis queue inside. If nearshore and multiple stations are going into the case, cover the samples, placing the label around the 1st sample. Invert one flask and start the next station at the next empty flask.
- Fill out labels for the next station.
CTD operators are responsible for sample-drawing correctness and completion so be sure to instruct sample drawers to check CESL for sample types and bottle #s. CTD operators should verify all samples are drawn including phyto (Pooh samples), DICs, JOSI, & NCOGs (if done). When stations come quickly, double-check with LTER personnel that all their samples are drawn before draining the bottles and re-rigging for next station. If the next station is within 1-2 hours, you do not need to close the unfired bottles unless there is a risk of contamination.
7). CTD post-cast maintenance (if next station is more than 1 hour away)
- Connect the pump tubes and flush the system with DI or MilliQ for ~10 seconds. Check the water is flowing out the other end without difficultly. Sometimes jellies get sucked into the plumbing and can restrict flow.
- Undo any open bottles, reset the carousel arms and flush with fresh water (hose).
8). Archiving:
- In seasave, print the 3 cast plots using <right><click>Print then <right><click>‘save picture as’ to jpgs (YYMM###a b & c; not necessary for northern stations unless requested).
- Open ZtreeWin, tag & print the .mrk and .prn files by highlighting them using the arrow key then pressing ‘T’ to tag. <Ctrl>P then <Enter> to print.
- Tag & move ALL the cast files (YYMM###.*) to the archive dir (except the ‘do-not-move-me xmlcon & readme.txt file) by highlighting each untagged file & pressing ‘T’ then <Ctrl>M to move, press <Enter> to keep the same *.* filenames, <up arrow> to display the previous dir (or type D:\YYMMSS\archive – year month ship cast#), hit <Enter> to select, <Enter> to execute, <Enter> to confirm – do not overwrite any files if prompted. Note: you can use Windows File Manager to do these steps but ZTreeWin has been used traditionally.
- Fill out a tab label with integer Sta, DDMMMYYYY, Time, Order_Occ
- Check the marker (.mrk) printout agrees with # of bottles tripped & fill out the remaining boxes on the console ops
- Bind the console ops, plots 1-3, mrk, prn (in that order) into the CTD binder.
- Reset Seasave onscreen plot labels to the next station by <right-clicking> on the main plot, edit the title then copy the edited portion by highlighting & pressing <Ctrl>-C; <right-click> each of the 3 plot files, highlight the old portion of the title then <Ctrl>V paste the new portion of the plot label.
- Fill out the station list sheet with the next Order_Occ. If the next station is shallow or basin, set the plot depths to the proper range (50m, 100m, 550m, 800m) on all plots by <right-click> Modify range.
NOAA ship operations are different since Fisheries Techs are watch leaders on NOAA ships. We still manage CTD logistics, working with the NOAA Survey Techs; hard-hats and work vests are required for everyone participating in deck ops
SIO-CalCOFI CTD-Ops Cookbook
- Prep the CTD ~20mins before sta. Pay attention to the “20 Minute Rule” – if the CTD cast will be within 20 minutes of the watch change, you should prep the CTD for the next watch.
- Rig lanyards, valves, spigots
- Pull caps, hoses, plug in ISUS, rinse transmissometer lens
- Prep Seasave:
- Start Deck Unit
- Start Seasave, fill out the header form, record deck depth
- Launch CTD and send it 10m
- Start 2min timer
- Check pump & sensors status & agreement
- Return to 10m & Start Archiving; hold for ~1min while recording start time, lat-lon, bottom depth.
- Send to depth, 515m depth permitting at 30m/min for 1st 100m then 60m/min weather-permitting.
- Downcast chl max determines cast type so select the appropriate form once past the chl max.
- At depth, record D, T, S, C (& Alt if shallow); mark then trip the bottle - create nav entry and CTDatDepth event for the deep bottle. Record time, lat-lon, bottom depth if changed.
- Raise it to next depth (+1 for remote depth box lag or -2 for SR wireout offset), log D, T, S, & C; mark & trip bottle
- After closure of the surface bottle, retrieve the CTD leaving Seasave running.
- Once CTD is on deck, record deck depth, stop data acquisition, turn off the deck unit, press <Ctrl><Alt>B.
- Turn off the Deck Unit; unplug the ISUS Battery; cover the pH sensor; secure the rosette, if rough
- Load sample log into CESL, change O2 case, salt case, nutrient rack color if necessary
- Take samples
- Add initials to CESL then save & print
- Filter chlorophylls
- Reset the CTD by rinsing etc (do it before chl filtering if weather is rough)
- Shake the O2 again, exchange cases, new sta labels
- Archive the cast
CTD Troubleshooting Tips
The cardinal rule is never doing anything to lose or overwrite the electronic data. Keeping an aborted cast’s duplicate data is a good idea. So if a cast is restarted after some data are collected, zip the original data files before overwriting – overwriting is preferred to preserve the data filename provided there is only one cast file. If there are multiple data files, use YYMM###A then YYMM###B...etc. Data files will be merged post-cast during processing - try to avoid gaps so if the data acquisition is interrupted, be sure to restart the cast so it overlaps the depth of signal interruption.
- Data Acquisition not started – if the CTD has started down and you discover data archiving was not started. Bring the CTD back to surface, start data archiving, wait ~1 minute, send back down. A 515m downcast takes ~12mins so this mistake usually takes that long to discover since you cannot trip a bottle. Since this is considered the best profile data, it is worth bringing the CTD back to surface and starting over unless shiptime is REALLY short.
- Interrupted cast – if the CTD has started down and there is a problem, here are some guidelines:
- If the CTD is going down and no bottles have been tripped, return the CTD to surface then stop data archiving. Go to Windows File Explorer and zip the data files to archive the aborted cast files (provided worthwhile data were collected). Re-start the data acquisition, overwriting the original data files. After ~1 minute at surface, send the CTD back down.
- CTD is going down and the winch stops, continue to log data until the problem is resolved. If the winch problem is not resolved within 15 minutes:
- if it is necessary to bring the CTD back onboard then log data until on deck;
- if the winch cannot move, stop data acquisition. Restart the cast from scratch when possble.
- if the winch comes back online and no bottles have been closed, return to surface, stop data archiving, zip the aborted cast files, then restart, overwriting the original data files (same protocol as a.)
- CTD is coming up and bottles have been tripped – be aware that stopping & restarting data archiving resets the carousel back to bottle #1. If you restart data archiving, be sure to rename the data file YYMM###B to preserve the first datafile & profile. You will have to re-trip the previous number of bottles so you are back in sync.
If you tripped 6 bottles then stopped data archiving, when you restart, you will need to trip 6 "ghost" bottles & create 6 "ghost" markers, at whatever depth you happened to be when you resume. This will create a second marker "B" file so after the cast is completed. You will have to merge and edit the mrk files, deleting the 6 ghost markers, before pressing <Ctrl><Alt>B. - If the Bottle Firing Sequence (main plot) resets to 1 or does not advance, continue to fire bottles until the right number fires. You do not need to make a new marker for each bottle – the number of markers should match the number of bottles fired successfully.
- Wire kink – if the CTD conductive wire catches on something and gets kinked. As long as the kink does not interrupt the signal, re-terminating may not be necessary. Move the cable-grip ("Chinese fingers") above the kink, looping & securing the extra wire along the top bottle ring.
- Bottle Closure Non-confirmations: on RV New Horizon, this was a conductive wire issue so it will be necessary to re-wire the termination. Only one good signal wire is needed so determine which wire is causing the problem and exclude it. Use the shield for ground/common.
- Significant Sensor Pair Disagreement – temperature, conductivity, and oxygen sensors are redundant. If they significantly disagree with each other, determine which sensor is faulty and replace it with a backup. This should be done asap although a CTD cast may be completed if one set of sensors is working properly. The faulty sensor should then be replaced before the next cast.
- Bottle mistrip(s) – if a position on the carousel is not closing properly, clean the trigger with a Q-tip to remove any debris that may be fouling it. If the position mistrips again, replace the trigger asap.
- Pumps do not come on or do not stay on – non-intuitively, this could be a conductivity problem. Check to conductivity value to be sure the sensor is behaving properly. It can be a bad cond sensor, bad cond cable, bad pump, or bad pump cable.
- ISUS signal gets extremely noisy - interesting problem on 1708SR, check the optical path for fouling. If clean, check the mirroring off the sensor optics - on 1708SR, the mirroring was lost somehow. Solution is to replace the sensor optical tip.